How To Add Images to a WordPress Website The Right Way
Images, and how you add them to your website, can make or break the success of your website. An unappealing, unprofessional photo or graphic can leave your visitors with a negative impression of your business. A great photo can grab attention; however, if the image is not prepared properly for the web, or if it is not technically configured well for search engines and performance, it can slow down your site and/or make it impossible for Google to find it or screen readers to describe what it is. Images can help your Search Engine performance (SEO) if they are formatted and configured properly.
Let’s take a look at the considerations and steps to take when adding an image to your WordPress website.
Finding Images
Make Your Photos Relevant and/or Attention-Getting
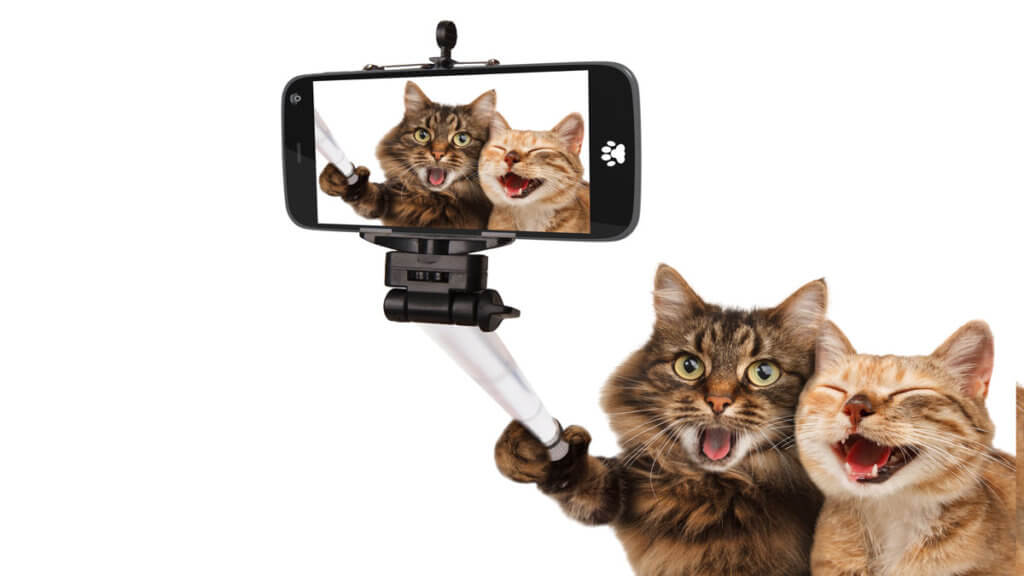
The images you choose for your website should be relevant to your subject matter, or infer a reference or irony. They should also be attention-getting. For example, we built a site for a lawyer who said he “turns the typical law firm process on its head” and used this image:

Stock vs. Original Photos
In some cases, such as the photo above, a stock photo may be appropriate to get your point across well. In general, we recommend you avoid using stock photography or choose stock photos that look less “generic.” Make your website as personalized and authentic as possible.
If you use your phone or camera to take your own photos, make sure they are good quality, and that you format them before uploading to the website (see below). The same is true if you hire a professional to take your photos – be sure you format them so they don’t slow down your load speed. Finally, avoid photos of “crowds” that do not have a singular focus.
Do not take stock images from a Google Image Search
If you choose stock photography, or photos that you do not own, always be sure to have permission to use them! There are lots of free stock photo websites which offer images “free for commercial use without attribution.” They are offered under the Creative Commons license. Never, never, never, ever use images that are not clearly marked as free to use. If attribution is required, be sure to follow the instructions on exactly how to credit the artist. There are lots of shady websites out there that LOOK like they are offering images for free, but the fine print has limitations on use. (TIP: “May be subject to copyright” means that the photo is not free to use.) So-called “copyright trolls” can come after you for lots of money if you violate the rules in the fine print.
Here are some great free and paid sources for stock photography:
Large, searchable collections of collections of free to use photos (some may require attribution):
Other free sites
- Reshot – These are more unique and look less like “stock” photos
- New Old Stock – Good for vintage photos
- Gratisography – By its own admission, these photos tend to be more “quirky”
Paid stock photo sites
We recently came across this article about Free Photography websites, and it also contains some really helpful information on Creative Commons as well.
Formatting Images
Once you have selected images for your website, it is super important to format them before uploading them to your site.
Crop and Retouch Images
If the area where your image will be placed is designed for a horizontal rectangle, crop your image to that size and shape. WordPress is not a good cropping tool for your images so it is best to make it look the way you want it before adding it to your site. Any other editing you want, such as changing contrast, enhancing color, or retouching should also be done ahead of time using a photo editing tool like Photoshop. Want to remove the background behind a photo of a person? A tool we love is Remove.BG.
Resize and Optimize for Web
If you love your photo exactly as it is on your phone and upload it from there to your site, you will likely immediately slow down the loading speed of your site. Your phone’s image resolution is generally 300dpi (dots per inch). The web uses 72 dpi. This means your images are more that 3x bigger than they need to be, and your server will suffer if you upload a bunch of images at 300dpi. In addition, the size of raw images from your camera or phone are probably over 3000px wide. Even for a retina screen, which uses “double” the dimension size of your images, this is too big.
It is best to use a tool like Photoshop, Canva or PicMonkey to reduce the dimensions of your images (we suggest for a full-width image designed for a retina display, a maximum of 2400px wide), and to reduce the dpi to 72.
In addition, you should use WordPress plugins like TinyPNG, Shortpixel, or WPSmush, all of which offer a free and paid version. These plugins will do an even better job of optimizing your images once they are uploaded to your website, ensuring that your site performance is as good as it can be when it comes to image sizes. When we do website audits and performance tests, the most common area for improvement is image optimization.
Uploading and Configuring in WordPress
Captions
This article by Neil Patel, “The Shocking Truth About How Web Graphics Affect Conversions,” has some great facts from a survey done to measure the impact of website images on conversions. It includes the statistic that captions get read FOUR TIMES more than body copy. Use your captions wisely, often, and effectively to help communicate your message.
Alignment
In his article, Patel also advises against breaking the flow of the text with a left aligned image. Align your images center or to the right.
Alt Text (Not Title Text) is Essential
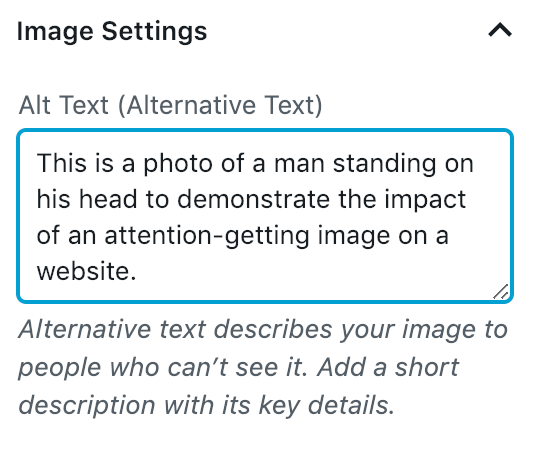
This simple step is skipped by many DIY website owners. Alt text is the text that Google and Screen readers use to describe the image content. Google does not have eyes, and many website users may have limited vision or a limited internet connection that does not allow them to view your image. Having descriptive alt text only takes a minute to add to the image settings when inserting into your page or post. Don’t forget this step!
Sharing on Social Media from Your Website
Open Graph and Twitter Card Tags
Sharing your website content on social media is an important practice. Content shared with an image is more likely to get attention. By default, with WordPress, most times your page or post featured image will be what social media platforms pick up with your link. This is not always the case, and you may want a different image to be featured in your social media posts. You have two options: you can explicitly tell the platforms which image to select, or you can use a plugin.
Code Your Own
If you are comfortable with code and your theme allows you to add code to your page HTML, you can add the following image tag to the <head> section in your page HTML:
<meta property=”og:image” content=”http://example.com/link-to-image.jpg” />
Use Yoast
An easier way to connect a custom image with your page or post is to use the Yoast SEO Plugin for WordPress. Yoast has a Social section where you can set your image for Facebook and Twitter. The Premium version of Yoast allows you to preview your Facebook and Twitter posts. Make sure you use a high-quality image, like the original image you used in the post, as the social platforms use higher quality/larger images more often than not.
If you have set this up correctly, and it doesn’t work, try to flush [link to TLC post on this]
There is more to the process of adding images to your WordPress website than you think! Like other aspects of your website and marketing tools, it is important to take the time up front to plan and prepare your content. As Benjamim Franklin said, “If you fail to plan, you are planning to fail!”
Need help selecting, formatting or configuring images for your WordPress website? Contact us for a free consultation.