It's all about the "S": Google and its HTTPS Policy
Head S Up if you are not using https!

Google has a policy regarding HTTPS on websites that you should know about. As a primary internet browser, dictates some best practices for website owners and developers. In the recent past, for example, Google started “requiring” websites to be mobile responsive in order to rank well in searches. The ultimate goal for Google is to make websites more user friendly – and they have the power to set standards and goals for website performance and design.
Last year, Google announced that they would begin explicitly labelling http (vs. https) connections as insecure.Google also announced that they will be using HTTPS and SSL as a ranking factor in their search results. This means that using HTTPS and SSL will help improve your site’s SEO.
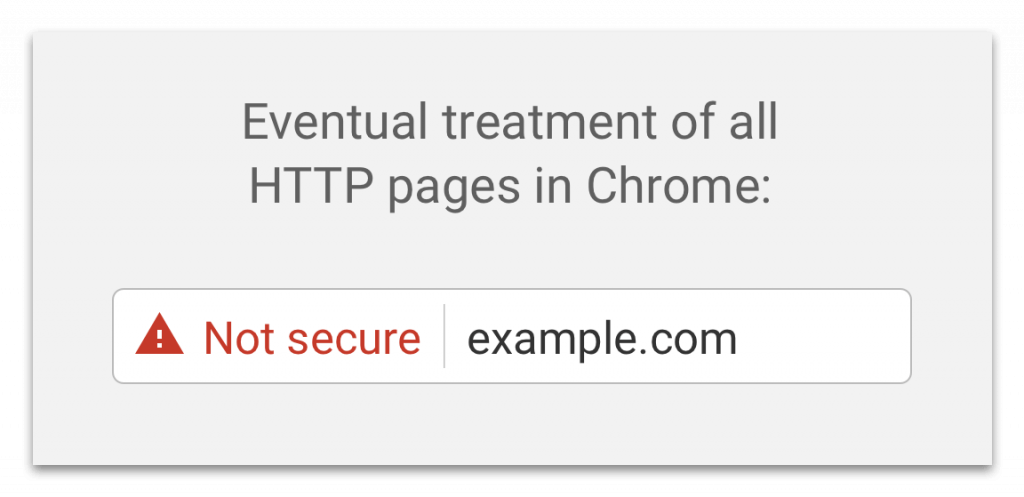
While websites that have an SSL certificate (https) have had a green padlock and “Secure” message in the browser bar, it was not until recently that Google has started to roll out a process of marking non-SSL sites as “insecure” with a warning message like this:

What is HTTPS?
HTTPS stands for Hyper Text Transfer Protocol Secure. HTTP is the protocol over which data is sent between your browser and the website that you are connected to. So websites with the extra “S” ensure that all communications between a user’s browser and the website are encrypted.
The way an HTTP websites becomes and HTTPS website is by the installation of an SSL Certificate. SSL stands for “Secure Socket Layer.” An SSL Certificate is a small data file that digitally binds an encrypted key to an organization’s details -basically it authenticates the identity of the website owner and encrypts the information sent to the website’s server by scrambling the data. This certificate acts like a digital “passport” for doing business on the web. The SSL is installed on a website’s server. SSL Certificates need to be issued from a trusted Certificate Authority.
Types of SSL Certificates
There are three types of SSL Certificate available today: Extended Validation (EV SSL – most expensive), Organization Validated (OV SSL) and Domain Validated (DV SSL – most basic, some are free). The encryption levels are the same for each certificate, what differs is the vetting and verification processes needed to obtain the certificate and the look and feel of in the browser address bar. The higher level of verification, the more secure, and expensive, the certificate will be. The most basic DV SSL, called “Let’s Encrypt” is free.
How to Add an SSL to your Website
Some website hosts, like WPEngine and Liquid Web, will install an SSL for free, or will automatically add it to any new WordPress install.
Some webhosts or website agencies may charge to install the certificate on your server. You can look at your hosting account to determine if their process is free, and if not, if it is worth a one or two click process to have them create and install the SSL for you. Note SSL certificates require your website to have its own dedicated IP address. If you are on a shared hosting plan (most likely you are) your IP is not a dedicated address. With a dedicated IP, you ensure that the traffic going to that IP address is only going to your website and no one else’s. Again, your webhost can take care of this for you, but may charge you for it and sometimes it may take 1-2 days for the process to complete.
If your webhost does not offer a free certificate on your website, another option is to use CloudFlare. You can create a free CloudFlare account and add it to your website. This will require you to change your domain name servers, which can be a bit intimidating, or you may want to ask your website developer, if you have one, to do this for you.
If you are comfortable working with your server, or you manage your own server, you can install an SSL Certificate on your own. This article explains the steps involved in this process.
Important Post SSL Install Steps
Once the SSL is installed on your website, there are a few things you need to do to ensure that all the content on your website is “served” over a secure connection.
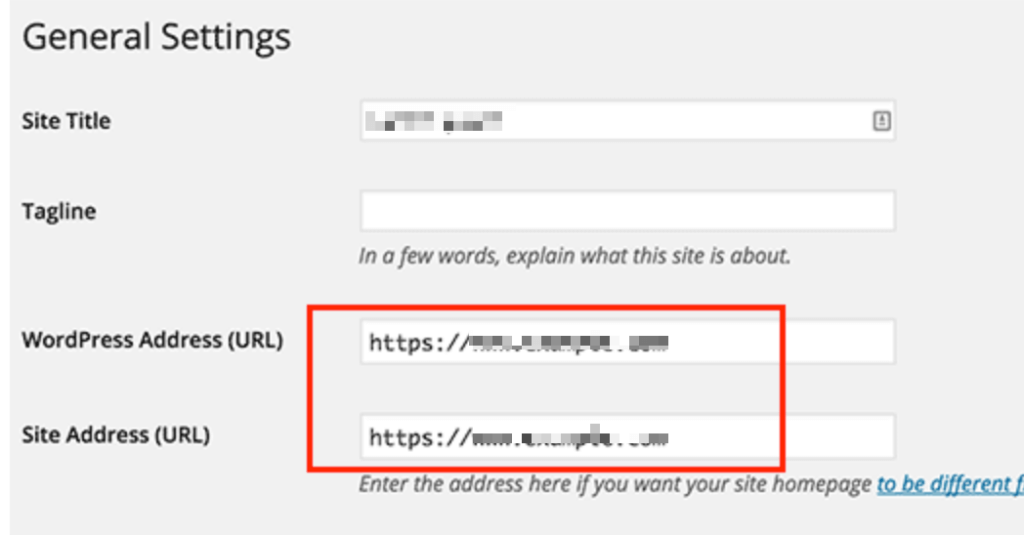
First, you need to change the urls in the Settings > General in your WordPress Dashboard.

Your webhost may have a setting that you can use to redirect all traffic to your website to https instead of http. You may also do this yourself by editing the .htaccess file to add (replace yoursite.com with your actual url!):
|
1
2
3
4
5
|
<IfModule mod_rewrite.c>RewriteEngine OnRewriteCond %{SERVER_PORT} 80 RewriteRule ^(.*)$ https://www.yoursite.com/$1 [R,L]</IfModule> |
If you are not comfortable editing files on your server (or if your webhost will not do this for you), you can use a plugin to force all content on your website to be served over https, called Really Simple SSL. This plugin automatically detects your settings and configures your website to run over https.
Occasionally you may still see errors on your site, and the “https” will be gray instead of green in Chrome (in Firefox there will be a yellow “warning” icon.) This means there is some content/internal links, usually image(s), which are still set to http instead of https. One thing you can do to fix this is to install a plugin called Better Search Replace. This will allow you to search for http://yourdomain.com and replace all of those links with https://yourdomain.com. Another option is a plugin called SSL Insecure Content Fixer, which allows you to configure settings to automatically server certain content over https instead of http.
If your host is helpful and you use a Let’s Encrypt Certificate, installing an SSL and taking care of the post-install steps can be complete in under an hour.
For those who prefer a video guide, GoDaddy has a nice overview that explains SSL Certificates:
Note that an SSL Certificate does NOT make your website secure in terms of preventing your site from being hacked. It is meant for securing communication between a user and your website – protecting the user’s data, not your website.
If you don’t have one already, the sooner you can install an SSL Certificate on your website, the happier Google will be with your website, the more comfortable the experience will be for your website visitors, and the more successful your SEO efforts will be.
This post contains some affiliate links. I only recommend products I use and love!